
Santa Doorstop-Doll

On to the next step in creating Santa as a holiday doorstop and/or RedWork doll this morning.

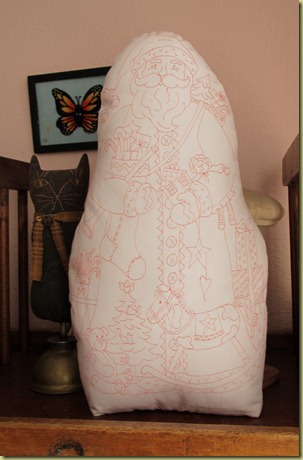
I have stitched Santa into the tall (16”) shape and stuffed it firmly.  I think it will work!!

Now I’ll trace onto our nice muslin and stitch him up to finish for real.  While enjoying the embroidery I’ll think about how to dress our snowman and angel to draw up next.  This is FUN!!

Comments

  1. A packet of washers, marbles, crushed walnut shells or even sand could be added to the base for some added weight and stability.

    ReplyDelete
  2. Hi Marcia!
    You are so right....I made a little muslin bag the size of the base of Santa and filled it with crushed walnut shells. After filling him at the top I settled the filled bag into the very bottom. Santa is standing solid and tall...thanks for thinking of other things to hold him up too!

    ReplyDelete
  3. Have you tried the crayon enhancement feature?
    Before you stitch, in the areas that you want to add color, first color with the white crayon, more scrubbing than coloring. You want to fully fill in the area for a good foundation. Then add the lovely reds & greens to the area that has been prepared with the white crayon. Now is your chance to shade, and add as little or as much color as you like.
    Coloring enhances the stitching nicely.

    ReplyDelete

Post a Comment

Popular posts from this blog

Are YOU Taking our RedWork Challenge???

We just had a call from the folks at Road To California Quilt Show. They want to list Your Names for the show book about our Special RedWork Challenge Exhibit . Email your name to me today so we can send soon! info@BirdBrainDesigns.net   Still time to start stitching and send by January 10!!

New Christmas Freebie for you

It is now only 25 days to the BIG Christmas Day.  Whip up a few tea towels or make ornaments with our December Freebie design . I embroidered Santa holding a mini Christmas tree on a Sage Green striped tea towel.  He only took a couple of hours one night to complete.  A hint for you to speed your embroidery.  Thread a crewel embroidery needle for each of the colors in your design.  You won’t always be pulling the thread out and changing color.  This little cutie would make a great ornament too.  Just do the embroidery on muslin and finish in your favorite way.  FUN! I used our handy dandy Transfer-Eze to print the Freebie Santa and finger press on our Dunroven House tea towel.  The Freebie design can be put on your light box to trace directly onto the fabric – BUT – toweling is a little thicker and rougher than muslin.  Using Transfer-Eze solves the problem.  The smooth Transfer-Eze film put on your towel gives you a nice design line to see and a smooth surface to stitch on.  T

Transfer-Eze Embroidery Magic

Lots of us have been having a wonderful time using Transfer-Eze , the NEW water soluble film on paper backing you can use with your printer.  Instead of the tedious task of tracing embroidery designs onto fabric you can print the design on the Transfer-Eze. I printed a snowmen for a new design twice – one for Embroidery and one for Needle Felting on wool fabric.  Just pull the Transfer-Eze film off the paper backing.  To conserve the paper, I cut off one snowman and still have 2/3 of the paper left to print on again later! Dark fabrics are nearly impossible to trace an embroidery design on as the light from your light box doesn’t go through the dark fabric.  Transfer-Eze is just the ticket!   Finger press your printed design on the dark fabric.  I found the Transfer-Eze adhered better to the fabric after the fabric was washed to remove the sizing. The printed design shows beautifully on the film pressed on the dark red fabric. This is going to be EASY to embroider!   Add your hoop